Putting up holiday lights may be daunting the first time, but once you get the hang of it – and the proper materials – you’ll be putting up a great display year after year. Here’s how to do it right.
First Things First: Safety
As with any major home project, there are some safety concerns:
- Working from a height. Ideally, you should use a step or multi-positional ladder, as opposed to an extension ladder. Have a spotter. And remember: if you have to strain to reach an area, don’t! Get down and reposition the ladder. For most homes, the roofline can be decorated from the ground using a tall step ladder. If you want to get on the roof, consider hiring a professional, particularly if you have a pitched roof.
- Electricity outdoors. All lights and extension cords should be graded for outdoor use. Do not use indoor electrical products outside. They will short out and will be a serious fire and electrocution hazard. Similarly, you need outdoor electrical outlets with ground-fault circuit interrupters (GFCI). If your home doesn’t have any, consider hiring an electrician to put (at least) one in. The investment will be worth it, especially if you’re planning on doing lights every year.
Aesthetics: What’s your Plan?
But you can also do a lot more. There are blinking lights coordinated to music (really), or you can cover each and every of your shrubs and trees in twinkling red lights, or you can buy an animated Santa to pop out of your chimney and shout, Ho ho ho! A well-executed “super house” decorated from curb to chimney is fantastic. People will be uplifted by your creation.
But, if you peter out halfway through or if, just for the heck of it, you buy each of the latest lighting trends to add to your beaming wattage, your creation may result in a Griswoldian nightmare. So plan carefully before you start – and make sure you have the time, money and passion to complete the job.
At the Hardware Store: Getting the Lights
Once you’ve settled on a design, take measurements to see how many feet of lights you need and what kind. Be sure you read this entire post and do additional research online so you can get everything you need at once. As you are light shopping, note that LED and incandescents will look mismatched next to each other.
Even different brands of the same type can vary – a ‘green’ from one company will look different than a ‘green’ from another company. And icicle lights will vary in length by brand. So, a flock of a feather should stick together – make sure each section of your design uses the same type and brand of light.
The best, safest way to attach your lights is with plastic “gutter and shingle” clips, or “deck” clips. Or, if you’re not going along the trim, adhesive clips can attach directly to the side of your home. These can be bought at the same time you buy your lights – ask your hardware store what type is best for your needs.
Also, consider a timer or a light-sensor-activated starter to turn on your lights each evening. You want your home shining even if you’re still at work or out with friends. And a wireless remote will let you easily turn off for the night without venturing back into the cold.
The Great Debate: Are LEDs Worth It?
LEDs may be the new kid on the block, but they have many advantages over traditional incandescent bulbs. They use about 10 percent of the electricity, last two to three times longer and are very durable – they’re made out of plastic and can handle jostling without breaking.
Also, you can plug approximately 25 strings of LED lights into one run and then plug that into one socket. In contrast, incandescents usually short out at around six strings, and sometimes as few as three, so you’d need an outdoor power strip or numerous outlets to do a big decorating job.
So what’s the appeal of incandescents? They’re traditional and they give off a warmer light profile than LEDs. Some people also claim they’re brighter. Plus, they’re cheaper at the register, even if they cost more in the long run.
Back at Home: You’re Finally Ready
While you’re still inside your home, plug your lights in and make sure they work – you don’t want to realize something’s broken only after it’s strung along your house. Then, attach the clips to each string at regular intervals. Again, do this indoors while you’re warm, rather than outdoors on a ladder, shivering.
Now, you’re ready to go out and hang up the lights! Be deliberate and make sure the lights are evenly spaced. While it’s easy to lose patience, slowly but surely will result in a professional-looking job.
The Greenery: Don’t Forget the Trees
The trees, bushes and shrubs in your yard make a great canvas for added lights.
- Bushes and shrubs: “Net lighting” makes your bushes and shrubs easy to decorate. Simply drape and wrap the net of lights over and around and you’re done! Just make sure you buy enough to fully cover each bush and shrub – a half-covered bush will look amateurish.
- Deciduous trees: Trees without leaves offer a natural design. If you tightly wrap each branch with lights, you’ll create a glowing outline of one of nature’s finest creations. Be warned that executing it is time-consuming and light-intensive – but it’s usually worth it. Use small white lights, since they’ll cluster well and will highlight the branch without overwhelming it.
- Evergreen trees: With an evergreen, decorate using the same wrap-around pattern you would for an indoor Christmas tree. Make sure to use large, bright bulbs that will shine through and won’t be overpowered by the thick needles. For taller evergreens, try using a light-hanging pole rather than a ladder.
Keep on Decoratin’: What about the Yard?
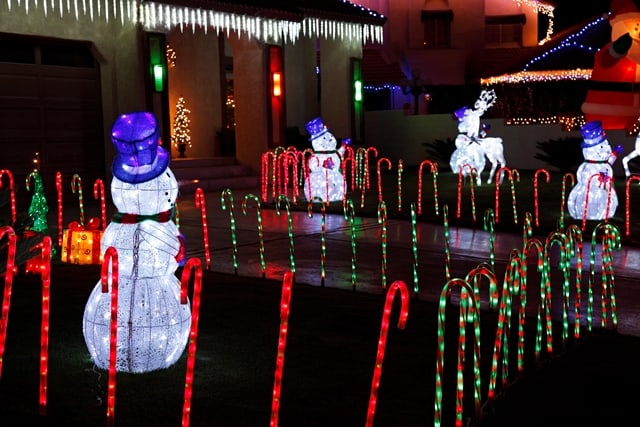
Standalones for your front yard add an extra layer to your display. Personally, I like inflatables. They always look good, they’re easy to install (simply plug in) and they light themselves. Whether you want a snowman, a menorah or Santa Claus on his sleigh, you should have no trouble finding what you need.
If you’re interested in creating a tableau (a nativity scene, for example) without electrified pieces, you’ll likely need some sort of ground lighting, which you can find at your local hardware store. Remember that everything, including extension cords, needs to be graded for outdoor use.
It’s January: Time to Take It Down
If you’re like me, your urge is to pull the lights off quickly and cram them into a box. Don’t do this! Trust me, I learned the hard way. The strings will get tangled and what was an easy take-down will become an intractable knot puzzle the next year.
Instead, buy a roller, much like you’d use for your hoses, to roll the lights around and keep them tangle-free. Or, for a homemade solution, simply take a medium-sized piece of cardboard and wrap the lights around it until it’s full. Repeat as with as many pieces of cardboard as necessary, and store carefully. The lights will be organized and easy to unwrap for the next season.
And, congrats! You’re done. You’ve made an awesome holiday lighting display for your home. And now you have the materials and know-how to do it all again next year!


 United States
 Canada